Author: admin
WordPress
WordPress is an online, open source blog application. Powering over 30% of the web, WordPress is easily one of the most popular content management systems (CMS) in existence today. WordPress forked from b2/cafelog in 2003, and WordPress MU multiple website functionality has been integrated since 2010. You can read more about the WordPress backstory here.
Mediawiki
MediaWiki is an open-source publishing platform that can be used for creating a collaborative document repository. It’s the software that drives the Wikipedia website.
You can learn how to use this application at the official MediaWiki Help Pages. This support documentation wiki will show you how to manage all aspects of your wiki, including customizing its appearance, editing content, and changing user settings.
Omeka
Omeka is an open-source web application that can be used to create and display online digital collections. Developed by programmers at George Mason University, Omeka was designed to be user-friendly, both during installation and setup and during daily usage.
You can learn how to use this application in the official Omeka Support Documentation. This support guide will help you get started and begin creating your Omeka site.
Scalar
Scalar is a content management system with the idea of creating non-linear books on the web. You can learn more about its functions here.
We recommend visiting the Scalar guide (http://scalar.usc.edu/works/guide/index) for more information on getting started.
Setting Up FTP
There may be times when you need to upload files to your website in the SUNY web hosting environment. There are a number of scenarios when this might be necessary:
-
You’re working with an application that allows you to install plugins/extensions, but the files need to be manually added to your file manager in order to install them. (Note: This is not required for WordPress which allows you to install themes/plugins through the WordPress dashboard.)
-
You’ve developed a custom site/pages using a Web design program, and you need to upload the files you created to your file manager
-
You’re installing an application that isn’t part of applications list in Installatron.
One way to upload files is by using the File Manager that is part of cPanel. However, sometimes you’ll find it easier/necessary to use File Transfer Protocol (FTP) to move files to your site. This can be particularly useful if you’re working with a Web space where you’re not the owner (so you don’t have access to the File Manager in cPanel) or if you need to provide file access to someone else to your space on the Web server. File Manager also only allows you to upload files one by one, so if you’re working with large amounts of data then FTP will be preferable.
What exactly is FTP?
File Transfer Protocol is a method that allows you to remotely move files to a Web server from another location – usually your local/personal computer. Using a pre-defined FTP account (with a username and password), you can configure an FTP client (a program you run on your computer that allows you to transfer files via FTP.
There are lots of FTP clients that you can use; some are free and some are not. A few free ones you might consider:
For the purpose of this tutorial, we’ll show you how to set up FTP in FileZilla, (Cyberduck instructions can be found here) but you should be able to generalize these instructions to use in any FTP client.
Get Information about Your FTP Account
If you’re connecting via FTP to your own space on SUNY, or if you’re setting up an FTP account for someone else to use, you’ll need to start by getting the proper FTP credentials from cPanel:
- Login to sunycreate.cloud.

- In the Search Box at the top of the page, search for “FTP”, and click the FTP Accounts icon that appears.

- Every cPanel has an FTP account by default, and you can find those credentials by scrolling down on the FTP Accounts page. You also have the option to create a new FTP account, which can be done by filling out the Add FTP Account form with a username and password. Unless you change it, the new FTP account will be limited to a directory with the same name as the account you’re creating. You can change this to a different directory, if you want to grant this account access to a different location. NOTE: Make sure you know/remember the password you enter. When you’re done, click Create FTP Account.

- Once you’ve created the new account, you’ll see it appear in the list at the bottom of the FTP Accounts page. In addition to any accounts you’ve created, in the Special FTP Accounts section, you’ll see the default FTP Account. You’ll know this account because the username corresponds to your cPanel username. This FTP account has full privileges to access all directories within your cPanel.
- For whichever account you need credentials for, click the Configure FTP Client link.
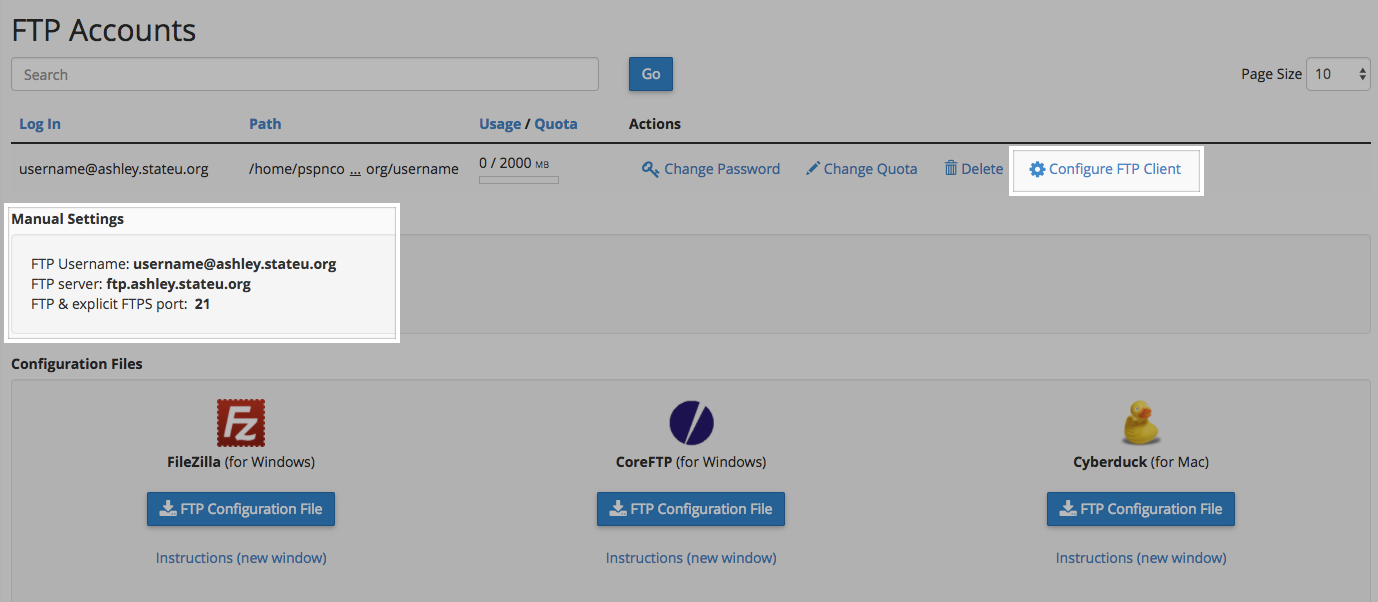
- Write down the username, server, and port information that appears. You will need to use this (or you will need to provide this to the person you are giving FTP access) along with the password you created in Step 3 in order to configure your FTP client.
PLEASE NOTE:
For cPanel’s default FTP account, use the following settings:
-Connect via SFTP (more secure than FTP)
-Port: 22
For an FTP account that you manually created (shown in Step 3 above), use the following settings:
-Connect via FTP (cPanel doesn’t allow an SFTP connection for manual accounts)
-Port: 21
Configure FTP in Your FTP Client
Below are links to tutorials for setting up both FileZilla and CyberDuck to connect to your FTP account.
For further assistance on FTP, read this guide.
WordPress Export/Import
If you are using your WordPress, you can also get an export of your posts, pages, comments, custom fields, categories, and tags.
The WordPress export is great for grabbing the content of your WordPress site so that you can import it into another WordPress host, such as WordPress.com or WordPress.org.
Note: Exports do not include plug-ins, or other site customizations.
Exporting
- From the Dashboard navigate to Tools>Export
The screenshot below shows how to export all of your posts, pages, comments, custom fields, terms, navigation menus, and custom posts. However, you can also export just certain posts, pages, or media.
This export process generates an XML file of your blog’s content. WordPress calls this an eXtended RSS or WXR file.
Note: This will ONLY export your posts, pages, comments, categories, and tags; uploads and images may need to be manually transferred to the new blog. If possible, do not delete your blog until after media files have successfully been imported into the new blog.
Importing
Once you have exported your posts, pages, etc., you can import them into your new WordPress site.
- Login to your new WordPress.com or self-hosted WordPress site and go to the Dashboard. From there navigate to Tools>Import and click on the link to “Run Importer“

- Next you will see a screen that prompts you to upload the WXR (.xml) file you generated through the export process. Browse to your exported WordPress archive and then click the “Upload file and import” button.

- Choose and upload your file. You will then be prompted to assign an author to the posts that you are importing. You can use this function to assign one author to all posts, or you can manually set the author for each post in the posts menu. Unless you have a space limit, you will also want to select the option to “download and import file attachments” before clicking the “Submit” button.

- When your import is complete, you will see a confirmation screen.

Your exported content is now added to your site. If you had posts on your site prior to importing, those posts are still available.
Because the export did not include themes or plug-ins, you will need to reinstall those separately from the export/import process.
Privacy
What you add to your sunycreate.cloud webspace rests entirely with you. You can choose not to pick a domain that reveals your name. You can use a pseudonym on your actual site. However, when you sign up through the default process, your name does get published as part of the public record about your domain name. Anyone can find it by looking up details about the ownership of that domain name through a public “Whois” request.
This is NOT an issue if you’re already planning on using your name openly on your site (in your domain name or elsewhere). This option is aimed, specifically, at those who, for whatever reason, feel they want to take every precaution to hide their identity on their site.
What Can You Do with Your Account?
Your ability to do things on SUNY is dictated to a large degree by the limits of your imagination. That said, there are some technical requirements and limitations that you should be aware of and might want to review.
To spark your imagination, here are some ideas that might help you get started:
Install a Web Application in Your Space
SUNY makes it very simple to install certain Web applications in your Web space. Web applications are just special software that run on a web server. Usually, they allow you to build and manage a website. The kind of site you can build depends on the type of application you install. Here are some examples of applications that you can easily install within the sunycreate.cloud web hosting interface:
 WordPress: WordPress is a simple-to-use blogging application. The tool also comes with a huge array of plugins & themes to allow you to create virtually any kind of website imaginable. We have guides on using WordPress here.

Omeka: Omeka is an open-source web application that can be used to create and display online digital collections and archives. We have information available to help you install and use Omeka here.
 Scalar: Scalar is a content management system with the idea of creating non-linear books on the web. You can learn more about its functions and how to install it here.

Grav: Grav is an open source, flat-file CMS made for folks who are looking for something a little more experimental. Grav provides a straightforward framework for creating pages and inserting media. We have additional resources for Grav here.
 Mediawiki: It is the open-source wiki software that runs the online encyclopedia, Wikipedia. This tool may be right for you if you’re interested in publishing documents and then collaborating with others on them. Find our guides on Mediawiki here.
These are just a few of the open-source applications that are available to you in your SUNY web space. We encourage you to read more about what Web applications are and which ones are available to you through this project.
Organize Your Site with Subdomains and Folders
Through this project, you’ve received a domain name that you can actually subdivide and organize anyway you like. One easy way to organize your domain is to create subdomains, in which you can then install other applications. In addition, you can just set up subfolders for your site (which can also have their own applications installed in them). Here’s an example of how you might organize your site (using the subdomain vs. the subfolder approach)
| Subdomain Approach | Subfolder Approach | |
| yourdomain.com (“root”) | Install WordPress as your “main site” | yourdomain.com (“root”) |
| course1.yourdomain.com | Install a second WordPress instance for a course you’re taking | yourdomain.com/course1 |
| photos.yourdomain.com | Install ZenPhoto for a public photo gallery of your photos | yourdomain.com/photos |
| docs.yourdomain.com | Install MediaWiki for a club you belong to that wants to collaboratively edit its bylaws | yourdomain.com/docs |
| files.yourdomain.com | Install OwnCloud so you can access your files on your laptop and at work | yourdomain.com/files |
This is just an example of a way to organize your site and then use different sections to do different things. There is no one solution to this challenge, and what you do should be driven by what makes sense to you. To start, you may just want to install one thing at the “root” of your domain, and then let the rest evolve as you get to know more about what’s possible.
Map Your Domain (or a Subdomain)
If you already have a digital presence that you’d like to pull into your SUNY Create Sites space, domain mapping is an option you may wish to explore. This allows you to assign your domain (or a subdomain) to another service. Some services that work with domain mapping are:
When you map a domain, users who visit your URL will automatically see your space on one of these services. It’s a great way to incorporate your activity elsewhere into your domain, and it might be a good first step if you’ve already established a presence somewhere else and just want to point your new domain to that space.
What Exactly is a Web Application?
In the most general terms, a Web application is a piece of software that runs on a Web server. A Web server is a just a specialized computer designed to host Web pages.
Most Web applications are comprised of two components: files and a database. When you install a Web application, you will need to make sure all of the files are copied over into the appropriate location AND that a database (and database user) has been set up to connect to those files. Often, you will have to do some configuration to make sure the application knows how to access the database.
The system we use for SUNY uses a special script installer called Installatron (in cPanel) that allows you to automatically install dozens of open source applications. When you use Installatron, you don’t need to worry about moving files, creating databases, or doing the initial configuration. It’s all taken care of for you.
In order to run on the SUNY server, Web applications must be able to run on a LAMP server, which is the particular kind of Web server that we use. Occasionally, a Web application may require additional components or modules that need to be installed on the server.
