Managing Permissions

The default Mediawiki installed has been customized to make it a bit harder for spammers to overwhelm wikis with illegitimate content and comments. This is done by modifying the LocalSettings.php file (a file that is included in every install in which it is possible to provide configurations details).

By default, Mediawiki allows anonymous users to create pages and edit pages in the wiki. The modifications change this in the following ways:

  • Anonymous users cannot edit existing pages
  • Anonymous users cannot create pages
  • Registered users must click the confirmation link in the registration email in order to edit or create pages

This approach should drastically reduce unsolicited content and comments on Mediawiki installations. One further step that administrator might take is to turn registration off after a predetermined amount of time. Users must create accounts by this date; after that, the settings are changed so that registrations are no longer open.

To add this setting, you must edit LocalSettings.php in your Mediawiki install:

  1. Login to cPanel and browse to your File Manager.
  2. In the File Manager, browse to the folder within public_html that contains your Mediawiki install. If you installed the wiki at the root of your domain, you won’t need to go any further than public_html. If you installed the wiki in a subdomain or subdirectory, you’ll need to find the directory that is associated with that space.
  3. Locate LocalSettings.php. Once selecting the file, click download in the top menu bar to download the file as a backup before proceeding. Then click Edit in the top menu bar to edit the file.
  4.  Confirm that you want to edit the file.
    Confirm that you want to edit the file
  5. Browse to the bottom of the document, and locate the custom settings that were added during the Mediawiki install and the following line:
$wgGroupPermissions['*']['createaccount'] = false;

Creating a Book

To get started in Scalar, you will need to create a book.

  1. Go to your Scalar site via the My Apps link or the Scalar URL you established during the setup process.
    Access Scalar site and click the Sign-in link
  2. Log in to Scalar using the username and password you set up during the installation process.
    log into scalar with your email and Scalar password
  3. Go to the top right corner and click, Dashboard.
    Scalar landing page and dashboard link
  4. Select the My Account tab and at the bottom of the page type in a title for your book. This can be changed at a later time if needed. Click Create.
    Scalar create new book
  5. You now see your book in the “My books” list. From there you will be able to build your Scalar book.

Working with Omeka Classic

Here are a few tips and tricks that can help make sure you get the most out of the Omeka software.

ImageMagick

Omeka requires the ImageMagick library in order to resize and generate thumbnails for your images. SUNY provides ImageMagic for all accounts, but occasionally you will need to manually enter the server path to the utility. The setting for this is located under the Settings > General tab and the path to ImageMagick is /usr/bin

image

PHP-CLI

Some plugins including CSV Import and Neatline may need to execute code using the command-line version of PHP. If your plugin requires this it can be enabled by editing the config.ini file in your File Manager under application>config.

Navigate to the line that reads:

background.php.path = “”

Change it to the following:

background.php.path = "/usr/bin/php-cli"


Installing Themes

Just as you would install plugins, installing themes to Omeka is very similar. Omeka has a few themes installed automatically that you have access to. But there are more themes available at http://omeka.org/add-ons/themes. There is no automatic installer so you would need to upload the theme to your File Manager in cPanel.

Start by finding the the theme you’d like to install. Download the theme by clicking on the red button.

After, you’ll go to your specific Omeka install. Click on themes.

Click Upload.

You can drag and drop the .zip file into the window or you can click select a file.

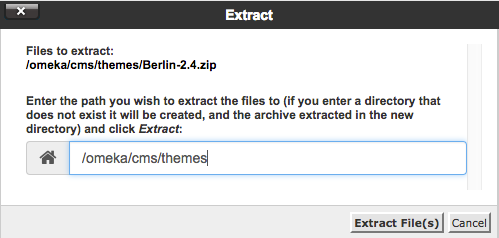
Once your file is uploaded to the themes folder you need to go in and extract the files from the .zip folder. Click on the theme file you just uploaded then click on extract.

You’ll need to confirm that you want to extract the files. Click extract files. 

Once the theme is extracted you can delete the .zip file and the theme will now be available for activation within your Omeka administration interface.

Installing Plugins

As you begin to use your Omeka install on Reclaim Hosting you may wish to add additional functionality by way of the various open source plugins available at http://omeka.org/add-ons/plugins/. Although Omeka doesn’t currently include an automated installer for plugins, the process of uploading them to your space is outlined here.

To get started you’ll want to log into your cPanel:

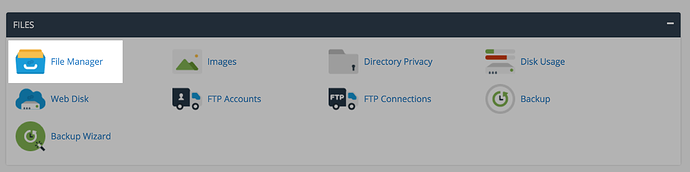
In cPanel you’ll access the File Manager located under the Files section.

In the File Manager you’ll navigate on the lefthand sidebar down to your plugins folder which should be one of several folders within your Omeka install (your root directory for your domain is public_html).

Here you will see all plugins currently in your Omeka install. To add a new one you want to have downloaded the zip file locally to your computer from Omeka’s website first. Then click the Upload button to upload the file.

The interface will allow you to drag and drop or select from your computer one or more zip files for the plugins you wish to upload. Once the upload has completed you can return to the previous screen using the link at the bottom of the page.

You should now see a zip file for your plugin in the plugins folder. The last step is to extract the contents of the zip file to the same folder. To do this select your file and click the Extract button.

Once the plugin is extracted you can delete the zip file and the plugin will now be available for activation within your Omeka administration interface.

Installing Omeka

To get started you’ll need to login to your control panel (https://sunycreate.cloud/dashboard) using your SUNY username and password.

  1. Once logged in you’ll be on the homepage of your cPanel. Navigate to the Web Applications section of the cPanel and find Featured Applications. Then select Omeka.
  2. This page gives you more information about the Omeka software. To begin the install, click install this application in the upper-righthand corner.
  3. On the next page, the installer will ask for some information about this install. The first thing you’ll want to do is decide where to install it. If you’re wanting to install Omeka on your main domain, you can leave the directory area empty. If you created a subdomain, you can select it from the drop-down menu. You also have the option of installing Omeka in a subfolder by typing in the folder name in the Directory field. Click here for more information about subdomains and subfolders.
  4. Scroll down to the next Setting section. Set an Administrator Username and Administrator Password. You will need this again shortly.
  5. By default the installer will automatically backup your website and update it anytime a new version comes out. While we recommend you keep this option, it is possible to only do minor updates, or turn them off completely. The installer will also create a database for you automatically, but if you’ve already created one for this website you can choose Let me manage the database settings and enter the details. Click Install to continue.
  6. The installer will take just a few moments to install Omeka and a progress bar will keep you updated. When it is complete you will see a link to your new Omeka site as well as a link to the backend administrative section for your Omeka site. Click the Omeka Admin link to configure your new Omeka installation.
  7. When you visit your new Omeka Admin link, you are asked for the admin username and password. Enter the Username and Password that you set for the administrative superuser (i.e. yourself).
    Omeka login screen
  8. Begin adding content in the Admin Dashboard. You’ll find lots of instructions, tips, and ideas on the Omeka.org documentation site.
    Omeka dashboard

iOS & Android App

You can download the WordPress app from the iOS App Store or the Google Play Store for your mobile device.

Screenshot Setup Tutorial:

  1. When you open the WordPress app, tap on Add Self-Hosted Site:
    log into your WordPress site from your smartphone
  2. Then, you will be able to enter your WordPress site credentials:
    These credentials come from your Installatron page of WordPress. To access these credentials, first find the applications you added with Installatron by clicking on the My Apps icon.My apps icon
  3. Next, click the title of your installed instance of WordPress:
  4. From here, under the overview tab, you can access your WordPress site credentials. You may change your user password by filling in the field next to password, scrolling down, and clicking the Save all button. Note that this sometimes takes a few minutes, so even if it doesn’t look like anything is happening, do not refresh your page after clicking save.
  5. With these credentials, enter them into the WordPress App along with the url for your WordPress website and select Next.
  6. On the next page, you will see all of the WordPress websites you have added to the WordPress App. Continue to the site you just added.
  7. To start a new post, tap on the Pencil Icon:
    pencil icon lets your create/edit blog post
  8. On this page, add your Title and Content. You can edit the properties of text by selecting the text and the different Text Property Buttons:
    Screen shot of Text Property options
  9. To view the progress of your post, select “…” on the top right of the screen and select Preview:
  10. When finished, select Publish:
    Publish post

Now when you visit your WordPress webpage, you will see your new blog post!

Managing Spam: Akismet

SPAM! Everyone hates it in their email. If you’re new to WordPress and blogging platforms, spam exists in the form of comment spam – people (or vermin) leave comments promoting their services or schemes, on a post or page.

So how do you deal with comment spam when it can come in even more often than email spam? Do you have to delete every comment that comes in? Well, the answer to the second question is “no”, and the answer to the first question is, with a plugin called Akismet.

  1. To get started we need to install a plugin. To do this, we’ll start at the Dashboard.Screen shot of WordPress Dashboard
  2. Navigate to Plugins > Installed Plugins.Screen shot of Akismet on plugins menu
  3. At or near the top of the list of plugins that are automatically installed in a new WordPress installation, is Akismet. It is not activated, so part of the process of getting Akismet is Activating the plugin. Before you activate it, however, you need to get something that will be somewhat strange for most people. It’s called an API key. API stands for Application Programming Interface, and it’s a way for programs and services to “talk” to each other. The Akismet plugin requires you to get an Akismet API Key, which is simply a “code” that you supply when activating the plugin. The key is free if you use it on a personal WordPress installation, and it’s available on the Akismet website.screen shot after activating Akismet
  4. Once you arrive on the Akismet for WordPress site, click the Get an Akismet API key button.Screen shot of Akismet web site where you get key
  5. If you have an account at WordPress.com you can sign in with that login and get your key. Otherwise, fill in an email address, a username, and a password to use for a new account. Click the Sign up button to proceed.
    create a wordpress.com account, if you don't already have one
  6. Type in the URL of the site you’ll use Akismet on and click on the Sign Up button under the Personal plan (that is if you want it to be the free version).Select desired Akismet plan
  7. When you get to the next page, the recommended contribution is $36. You can adjust the slider down to $0. The smiley face will begin to frown, but at least your key will be free. Lastly, fill in your name and click Continue.
  8. You’re finished with the sign-up process for your key, and it will be displayed on the page for you (we’ve blurred ours out).Akismet key
  9. Now follow the steps that they show you for using your new key. You will enter the key in either the Akismet area under Plugins or JetPack (if you have that installed).Akismet key

Choosing Your Domain Name

Choosing your domain name is the first step in getting started with staking your claim on the web. Your domain name is a unique Web address (e.g. yourname.sunycreate.cloud) that can be used to build out your own digital presence. As you make your choice, there are a few considerations to keep in mind:

Your Domain Name Must Be Available: Domain names must be unique, which means in order for you to claim your own, you need to be sure that it is currently available (and not being used by anyone else or any company or organization). There are lots of tools to check on domain availability, and when you sign up on sunycreate.cloud, we’ll actually check the availability of your choice for you. If you’d like to spend some time thinking about your choice and checking availability before you actually sign-up, we recommend using whois.com.

Choose a Domain You Can Live With: You should choose a domain name that you feel you can live with for quite some time. You should pick something that you won’t find embarrassing in the future. A good rule of thumb is to pick a domain that you would be comfortable putting on a future job application.

You May Wish to Include Your Name in Your Domain: There is no requirement that your domain reflects your specific identity in the form of your first and last name. However, choosing a domain name that includes your name may make it easier for you to achieve higher rankings in search engines when someone queries your real name.

Pick a Domain you Like: At the end of the day, your domain should reflect you. Pick a domain you like and are proud of. It can reflect your interests, sports you play, or your hobby. Or it could just be your name. The “right” domain for you is the one you’re comfortable with.

Signing Up

Review the Guidelines

Before you get started, we recommend that you review our information about Choosing a Domain Name.

The Sign-Up Process

Once you’ve reviewed the guidelines, you can proceed to the sign-up page.

  1. Click the “Get Started” Button
  2. You will be redirected to login for verification. You will use your SUNY Create username and password to log in.
  3. You are now ready to create a domain. You can either set up a free subdomain, or agree to a $12/year charge for your own domain. Select the option you want.

Option 1: Free Subdomain

For no cost, you can create a subdomain of sunycreate.cloud.

To create a free subdomain of sunycreate.cloud, leave this default option selected and enter the subdomain name you want for your website. When you’ve found an available subdomain, click the button labeled “Continue.”

Confirm that you like the name you selected. If you do, click the “signup” button. (If not, click the “start over” button, and repeat the above step.)

You should now see a screen confirming that your subdomain is ready. After a few seconds, you will see the regular cPanel options.

Option 2: Buy a top-level domain from Reclaim Hosting

It is easy to create your own top-level domain. This allows you to select a URL for your website that is easy to remember and share.

While you are at SUNY, this is available for a nominal cost (currently $12/year). You can continue to use this domain after leaving SUNY Create, although the cost may increase.

To create a top-level domain, selected “Register a new domain” and enter the name you want for your website. Click the button labeled “Continue.”

The system will make sure your selected name is available. When you see a message that the name is available, select the number of years you are registering the domain name and click the “Continue” button.

You will now see the new name, along with an invoice. Confirm that everything is the way you want it, and click the “Sign Up” button–or click the “Start Over” button and return to the above step.


Continue as prompted.